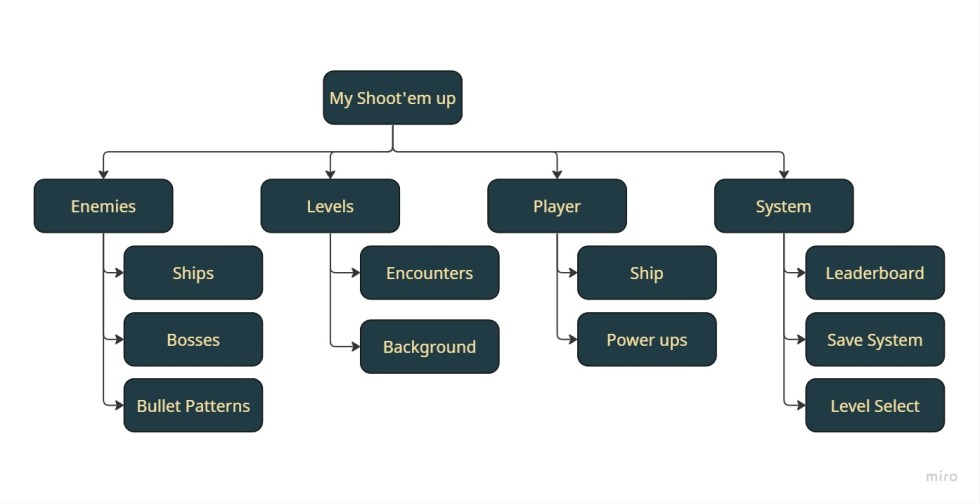
A Module Map is a graphical representation of all the different systems that makes up a game. It divides the game into different Module (collections of systems that work together for a specific purpose) and divides these in turn into Sub-Modules (collection of mechanics that form systems). Though very similar in spirit to game features, modules are more inclusive and not necessarily gameplay focussed. Matchmaking, data collection and automated bug tracking are all modules, but wouldn’t necessarily be considered game features. Remember that a Module Map represents the entirety of a game, and not just what is seen by the player.
The difference between a module and a submodule can be fuzzy at time and how to construct these can vary greatly from person to person. The exact way things are divided isn’t as important as it encompassing all work and everyone accepting a single setup. At this stage in the process, there will still be many unknowns in terms of the details of the game; the module ma can reflect this uncertainty and does not need to go into the nitty gritty yet. For example, a module can be Weapons even if we don’t know the exact number of weapons our game will have.
Using this tool, will allow the team to better understand the scope of what their discipline is building and prioritize accordingly.

I first heard of this tool in conversation with Alexandre Mandryka of Game Whispering

Before beginning a Module Map, make sure that everyone that is part of the implementation has a good understanding of the high level game concept.
- Gather the team in front of a whiteboard (virtual or real) and make sure everyone has sticky notes. Write the game name on the board and make sure to answer any questions they might have about the high-concept game design.
- Give the team members sticky notes and ask them, from their discipline, what modules make up the game. Give them some time to write down their thoughts (one module per sticky note).
- After time is up, start one by one adding them to the whiteboard underneath the game name. Discuss. If people have similar modules, you can put them all together.
- Once everyone has agreed on the modules; repeat step 2 but this time focussing on creating submodules for one module.
- Once more add them to the whiteboard underneath the module sticky and discuss.
- Repeat step 4 and 5 for each submodule until complete. If new submodules or modules come up during conversation, write them on their own stickies and add them to the board.
When you have gone through all the modules, you can now document this as the module map and start discussing the priority of each one. In general you want to prioritize core systems over secondary ones and riskier modules over safer ones.
Sub-sub-modules also exist… Go down as many levels as you need to get a full understanding of the components of the game (but avoid the temptation to design all the minuteae). This will give you a pathway to start designing and implementing the rest of the game.

Let’s imagine that we are working in a 1980’s style space shoot’em up, in the style of Gradius.

If this was our project, then our module map might look something like this:

In this case, Enemies, Levels, Player & System are all Modules, while the rest are sub-modules. This is only one way of dividing the game, and other configurations (for example, putting Level Select under Levels) would be equally valid. Notice how some sub-modules (such as Backgrounds), are not directly gameplay related; however, it is still important to include them. From here, it’ll be easier to proritize the different elements of the game for GD-3.
- Net Promoter ScoreA one question survey for when you’re short on time.
- Resources LoopThis is a specialized core loop for visualizing how the economy of a game works.
- MDA FrameworkOne of the most widespread ways to analyze a game holistically.
- One PagerA critical part of pitching a game idea to the wider team.
- SWOT AnalysisAn easy framework for analyzing the competition.
- Bartle’s Player TypesOne of the oldest & most widely used player categorizations


